 Check/Assign Member Lift ( Modeling )
Tool summary :
The Member Lift window opens when you Check/Assign Member Lift . It also opens for an " Edit " operation done using Manage Lifts when the selected lift is a member lift.
Also see :
|
- Modeling (where Check/Assign Member Lift is a tool)
- Crane placement ( Check/Assign Member Lift can optionally add a lift to the one selected)
- Edit using Manage Lifts (another way to open the Member Lift window)
- Lift Information (window opens in step 6 )
Check/Assign Member Lift ( step-by-step instructions ):
You must be in Modeling and do either step 1 (preselection) or step 3 (in-tool selection) to Check/Assign Member Lift . Selecting a crane placement selects its associated crane and sets the default Lift Configuration settings that will be applied to the lift. Before Check/Assign Member Lift , you should Open ( Ctrl + o ) a view that shows the crane placement you want.
1 (optional) : Select the crane placement that you want to set the default Lift Configuration settings and to which you can optionally, in step 5, add the lift. There's multiple ways to do this.
|
|
|
Select Items bindings |
▸ Move your mouse pointer (
) so that it hovers the crane placement that you want and so that it (the crane placement) is highlighted.. A balloon description (if that feature is turned on) will identify the crane placement's " Placement name ." Left-click ( Select ) to select the placement. Go to step 2.
▸ Move your mouse pointer (
▸ In the Model Tree , click the [+] for the " Cranes " category, then click the [+] next to the crane name, then select the name of the placement you want to select. When you select the placement in the Model Tree , it is selected in the model. Go to step 2.
2 . Invoke Check/Assign Member Lift using any one (1) of the following methods:
▸ Click the Check/Assign Member Lift icon. The icon can be taken from the group named ' Model -- Cranes ' and placed on the ribbon.
▸ Check/Assign Member Lift can also be configured to be invoked using a keyboard shortcut , the context menu , or a mode . For the lightning interface, this configuration is done using Customize Interface .
3 . Skip this step if you already selected a crane placement in step 1.
|
|
|
Select One Item bindings |
3a (if you didn't preselect) : Select One Item mouse bindings become active, and the status line prompts you to " Locate crane placement ." Left-click ( Select ) one crane placement .
4 . The status line prompts you to " Select members ."
|
|
|
Select Item(s) bindings |
4a : Use Select Item(s) mode options to select one or more members. You can also select members by drawing an area box or using the Model Tree . Press the Enter key or right-click ( Menu ) and choose " OK " on the menu when you are done selecting members.
5 . The Member Lift window opens.
5a : Make whatever choices you want to make on this window in order to further define the lift, then press the " OK " button to continue.
5b (if you chose ' Select location ' for " Pick location ") : The status line prompts you to " Locate pick location ." Optionally select a Locate option (e.g. INCL ), then move your mouse pointer (
) snaps to the point that you want to be the pick point, then left-click ( Locate ).
6. The Lift Information window opens. Most of the settings on the window are read-only. The window reports the calculations required to determine the " Status " of a lift.
Alternative 1 (add the lift to the placement) : Check the box for "
Assign to placement ," then press the " OK " button. Tip: You can use Manage Lifts to confirm that the lift has been added to the placement.
Alternative 2 (keep the lift unassigned) : Press the " Cancel " button. Or, if you insist on pressing " OK ," uncheck the box for "
Assign to placement " then press the " OK " button.
| Member Lift |
|
An "Assembly" is a member lift that consists of multiple members that are lifted together and placed together (not individually). The set point " Location " for an assembly is the center of gravity of the assembly's component members. | ||||||
| FYI : A multi-lift is also a lift that consists of more than one member, but the members in a multi-lift are set down individually. The set point " Location " for a muli-lift is the center of gravity of the one member that is farthest from the crane. |
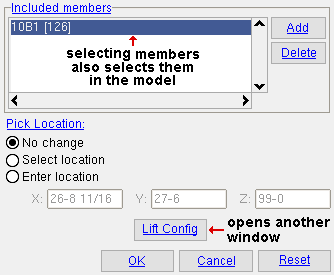
![]() lets you select in the model members that you want to add to the lift. Select Item(s) mouse bindings become active so that you can Select (left-click) or Select+ (left-click with Shift pressed) or Select- (left-click with Ctrl pressed) to select the members. You can also select members by drawing an area box or using the Model Tree .
lets you select in the model members that you want to add to the lift. Select Item(s) mouse bindings become active so that you can Select (left-click) or Select+ (left-click with Shift pressed) or Select- (left-click with Ctrl pressed) to select the members. You can also select members by drawing an area box or using the Model Tree .
|
|
|
Select Item(s) bindings |
Press the Enter key or right-click ( Menu ) and choose " OK " on the context menu when you are done selecting members. The members that you select will appear in the list to the left of the " Add " button.
![]() deletes the selected member(s) from the lift. Be aware that you cannot delete all the members that are listed. If you do, you will get a warning when you press the " OK " button, and you will not be allowed to leave this window until you add a member to the lift. To restore members you have deleted, you can press the " Reset " button.
deletes the selected member(s) from the lift. Be aware that you cannot delete all the members that are listed. If you do, you will get a warning when you press the " OK " button, and you will not be allowed to leave this window until you add a member to the lift. To restore members you have deleted, you can press the " Reset " button.
Pick Location: ![]() No change or
No change or ![]() Select location or
Select location or ![]() Enter location . You may want to move a lift closer to the crane to make it easier to lift.
Enter location . You may want to move a lift closer to the crane to make it easier to lift.
'
No change ' keeps the " Pick Location " where it is at.
'
'
![]() opens the Lift Configuration window. "
opens the Lift Configuration window. " ![]() AUTO " settings on that window apply the choices made to the Lift Configuration for the crane placement that you selected in step 1 or, if you didn't do step 1, step 3 .
AUTO " settings on that window apply the choices made to the Lift Configuration for the crane placement that you selected in step 1 or, if you didn't do step 1, step 3 .
|
Key concept: When you open the Lift Configuration window by invoking Manage Lifts then selecting a member lift then pressing " Edit " then pressing " Edit Config ," the individual lift may have non-auto settings ("
![]() To close the Member Lift window:
To close the Member Lift window:
![]()
![]()
![]()
"OK" closes the Member Lift window and saves any changes that you made to it.
For a Check/Assign Member Lift operation , proceed to step 6 of the step-by-step instructions.
For an " Edit " from the Managed Lifts window , any changes that you made on the Member Lift window will be retained.
"Cancel" closes the window without saving any of the changes you made.
"Reset" reverts the state of the window back to how it was when you first opened it.

